Many have asked and therefore many will contribute.... please open source uiFlow so we (the community) can help fix bugs and add enhancements (new blocks).
Posts
-
[UIFlow] Open source UIFlow
-
RE: Receiving data with ESP Now in UIFlow
Here is a simple flow that you can program on each M5StickC device that will send (Tx) and receive (Rx) a counter value using ESPNow.
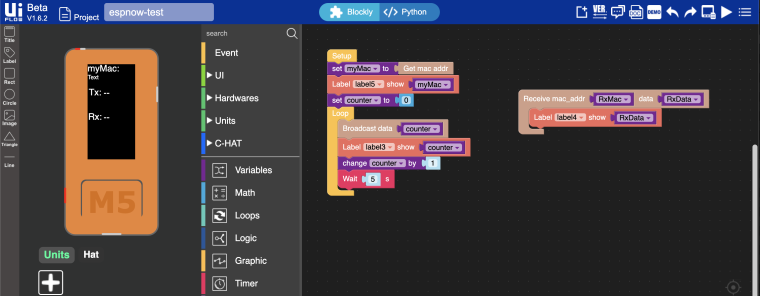
I'm using broadcast to send the counter values, so will send data to all devices listening on the ESPNow network.
To make it point-to-point, you could use the "Add peer" block with the mac address of the other device within the flow and then use the "Send message with id" block to send data to only a specific device by its mac address.
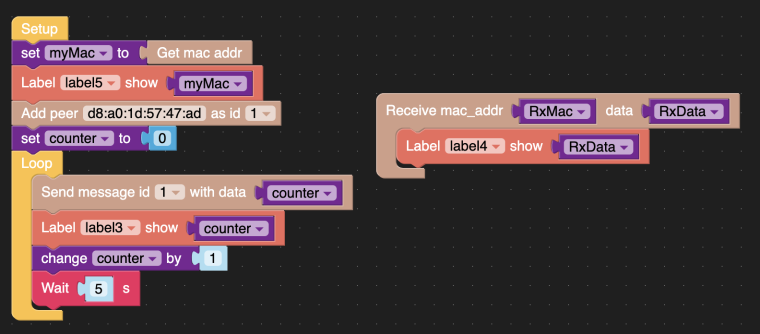
If you had more than two devices on the ESPNow network, you would add multiple "Add peer" blocks (also changing the mac and ID values for each one) and multiple "Receive mac_address" blocks (also adding the specific mac you want to receive data from) to distinguish who was sending the data and who could receive the data.
Hope this helps!
-
RE: M5stack original firmware (binary)
I also flashed mine with micropython. To get it back to the factory program that came installed, I connected it to the Arduino IDE, selected Tools > Board: M5Stack-Core-ESP32. Next I opened: File > Examples > M5Stack > Basics > FactoryTest. Upload that to the m5stack and you should be back to the factory program.
If you don't have the M5Stack custom libraries, you can install it from Sketch > Include Library > Manage Libraries... Type m5stack in the filter box, select the result, and install the latest version.
-
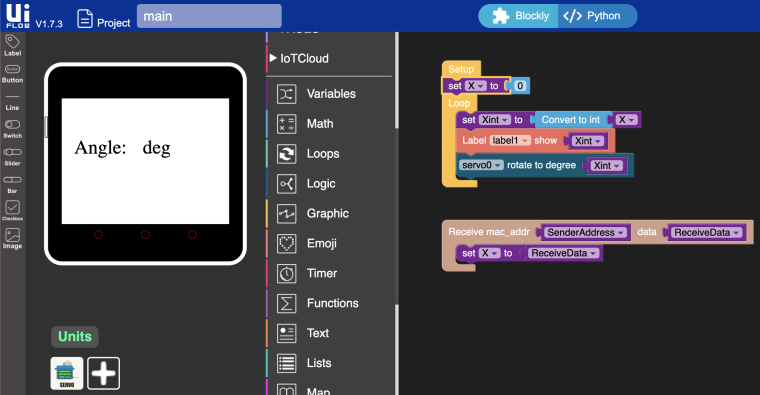
RE: need help converting text to int (CORE2)
I think your issue is because you are using variable X within the ESP Now Receive Callback to hold the string data coming from the ESP Now transmitter device. Then within the Loop, you are trying to convert it to an integer. Upon program execution, the Python code has X=None, and is trying to convert X (which has no data yet) to an integer, thus throwing the error: can't convert noneType to int. So you have a few options. These worked for me.
-
Define X within the Setup function like this...
-
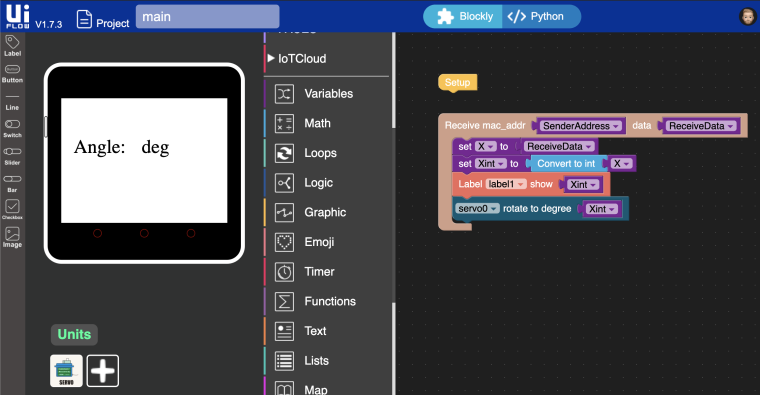
Redesign your program to perform all the calculations within the Receive Callback function. I actually prefer this option, because it doesn't require a Loop and is therefore non-blocking (no 1 second delay in the Loop). You're just waiting to receive data from ESP Now and then take action on it. However, I'm not sure what the rest of your program is supposed to achieve, so just take this into consideration.
For reference, here is my ESP Now transmitter flow. It's an M5StickC with the JoyC Hat. It sends the X position data of the left joystick, mapped from 0 to 180, so it will turn a servo connected to port A on the Core2 (the ESP Now receiver).
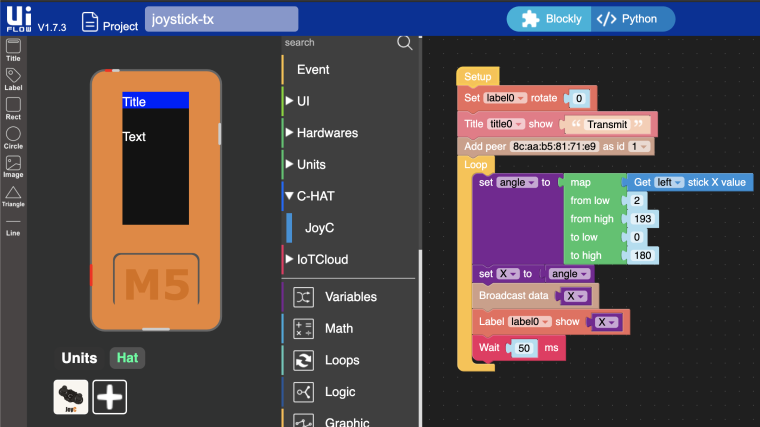
-
-
RE: M5StickC Nixie tube Clock
I implemented the Nixie tube clock in uiFlow IDE for the M5StickC-Plus device.

https://github.com/bstein2379/M5StickC-Plus-Nixie-clockCredit goes to @macsbug for the original idea. I just made it easier for new programmers and kids by using the uiFlow IDE.
-
RE: [Solved] Poweroff M5Stack using uiflow?
Hi @sjako
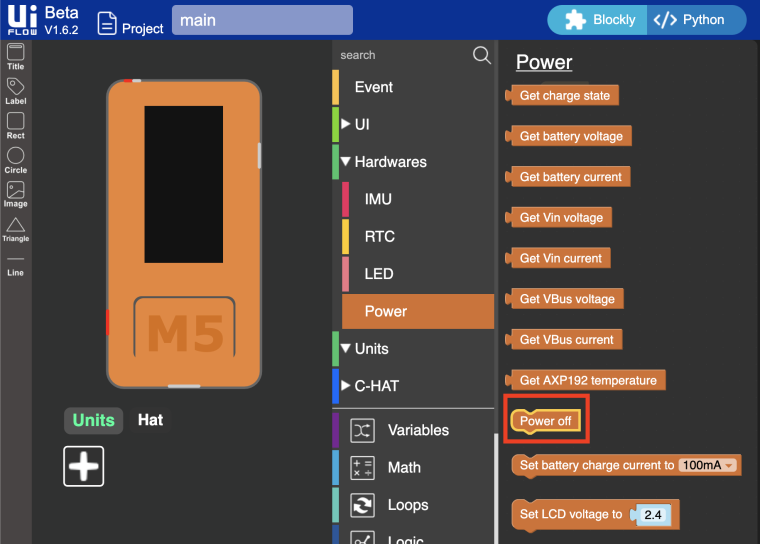
There is a "Power off" block in uiFlow if your device is the M5StickC, M5StickC-Plus, or Core2 since they have the newer AXP192 power management chip.
The other M5stack devices like Core (Black), Grey, Fire, M5Go, etc. have the older IP5306_I2C power management chip with limited power functions, so the same "Power off" block does not exist in uiFlow for these specific devices. Also, when these devices are are charging with the USB-C cable plugged-in, there is no way to turn them off by double tapping the red power button on the side. Double tapping the power button just resets the device while the cable is plugged in. The USB-C cable has to be unplugged in order to turn it off. It's just a limitation of the IP5306_I2C power management chip, which is why I think M5Stacked moved away from that chip in favor of the AXP192 on newer device models.
So your options include:
-
Use the M5StickC, M5StickC-Plus, or Core2 device as your timer and use the native "Power off" block in uiFlow
-
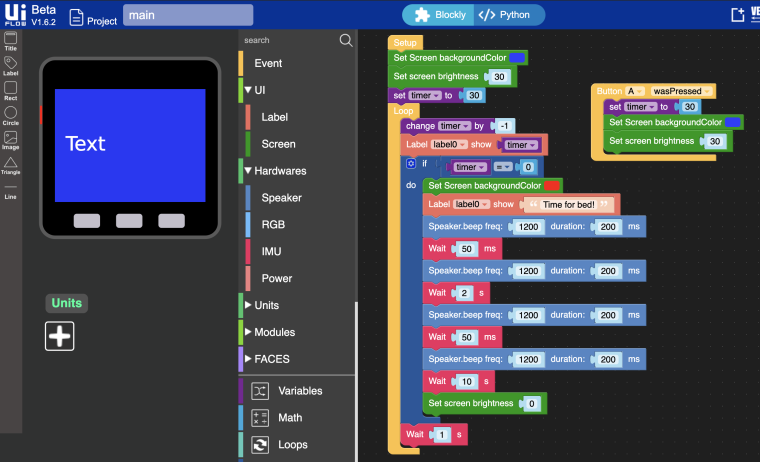
Just turn the screen off (brightness=0) after the timer exceeds the set time. Then you could use a button callback to turn the screen back on and reset the timer.
-
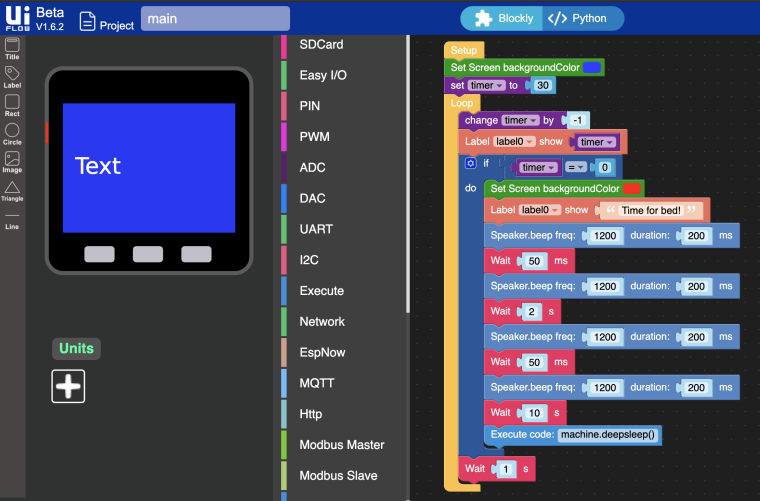
Have the device go into deep sleep after the timer exceeds the set time by using the Execute block. This will essentially shutdown the M5Stack. To turn it back on, tap the red power button once and it will boot-up and start the last running program again (assuming you Downloaded the program to the device and the device is in App mode).
Hope this helps!
-
-
RE: [Solved]M5StickC firmware
@arzaman said in M5StickC firmware:
@world101 thank ,
so the same bootloader works for arduino IDE and UIflow ? if so is awesome
so what is the "original" FW that is pre-loaded?
If I udenrstand well the UIflow V1.2.3 loads on ESP32 micro python so sounds strange to me that once you have loaded the UIFlow FW you can use also with arduino IDE (C++)anyway I will try
D.
No it’s one FW or the other. The original FW should be uiFlow (MicroPython), at least for the recent hardware. The older hardware cores (M5Stack black or grey) shipped with a factory test Arduino sketch. All the newer hardware should ship with the uiFlow firmware.
Flashing the hardware with the Arduino IDE will overwrite the uiFlow firmware. To get it back to uiFlow (MicroPython), use m5burner.
-
RE: The Max value of the slider cannot be modified !
Yes, I agree this is a bug with the slider object and also the bar object in the UI simulator, but you can easily work around the bug with the
Set range min maxblock until m5stack fixes it.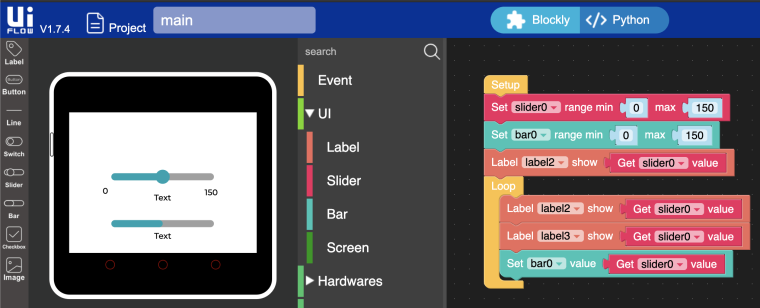
-
UiFlow needs https
@m5stack please also configure http://flow.m5stack.com/ for https like you did for this community forum. Thanks!
-
RE: UIFlow Github project?
I feel your pain. I’ve been buying M5Stack products for more than 3 years now, after learning about the company from their Kickstarter campaign. They are such cool “complete packaged” products and nothing like it in the market right now. I just can’t stop buying things from them. However, there are some serious challenges when you really dig into the details of the products. Engineering-wise they are pretty good and so compact. Sometimes there are hardware flaws (noisy speaker, conflicting GPIOs, m5stickC battery drain, etc.), but I’ve seen a relatively low number of those over the years. Is it perfect? Nope. Lacking documentation is the biggest complaint. Personally I think they release products a bit too quickly. I’m all about fast innovation, but IMHO they should wait until all software, docs, and good examples in Arduino and uiFlow/Micropython are ready. But their slogan is “ideas fast tracked” not “IoT products for retail and commercial solutions.” So you have to take the good with the bad I guess. 🤷🏼♂️
If you care to share your feedback, they released a customer survey here:
https://m5stack.com/blogs/news/m5stack-customer-survey-2021 -
RE: Trying to search information about layers order in the UI design of UIFLow
It's actually the opposite as you describe. A higher layer takes visible priority. So when displaying text or shapes on the screen, an object on layer 8 is "on top of" (or covers over) an object on layer 3, and there is no transparency (see through).
The tricky part is once you move your rectangle to highlight the next label, you have to redraw (or show) the changed areas of the screen. So the layers and screen management take some getting used to within uiFlow.
Here is an example flow of what you are looking to achieve.
Layers 0-3: reserved by uiFlow by default
Layer 4: rectangle
Layer 5: Label 1
Layer 6: Label 2
Layer 7: Label 3
Layer 8: Label 4
Note: In the M5StickC UI simulator on the left, you could manually change Labels 1 through 4 to all be on layer 5 and it will still work, since those labels do not overlap.
-
RE: Randomness ...
1/ Possibly, but I'm not sure how you would verify the extents/limitations of the hardware while using uiFlow. I think in general though, working with the UI elements of uiFlow can be a little tricky at times, especially with more complicated programs like this. You have to carefully manage the UI elements and the layers they are on. If you make changes on the screen, you might have to update the elements with the
Set ... show/hideblock to ensure they display properly after making a change to the display. Sometimes it's a bit of trial and error for me. I have developed some fairly complex flows on the M5Stack devices with uiFlow. Here is one example. I'm not a software programmer though, so other people might say it's not complex, but it was for me ;-)2/ Arduino would give you more control vs. uiFlow where you rely on blocks to do the work (coding) for you. If you don't know what's going on "under the covers" of the blocks (due to lack of documentation, uiFlow not being open source, etc.), it's hard to debug the corner-case issues. The downside to Arduino is that UI development is harder (you can't just drag/drop elements to the screen like with uiFlow). Also, you need to be a good programmer and understand all the syntax to make something work :-)
3/ Not quite sure yet. I'll give your program a try to see if I can figure anything out. Can you please also post the images that go above buttons A, B, and C? I already have HA set up and ready to go.
-
RE: Reprogramming the Faces keyboard
M5Stack sells the programmer:
https://m5stack.com/collections/m5-accessory/products/isp-usbasp-programmer
-
RE: [MQTT-Core] Support for RETAIN
What all have you tried and are you using uiFlow or Arduino?
I'm pretty sure they implemented it a while back, as I originally requested it more than a year ago. I haven't tested it recently, but I believe it was working before. Let me do some digging and I'll see what I can come up with.
-
RE: M5Stack Gray reboots when USBC power removed
Just found this on Twitter: https://mobile.twitter.com/lovyan03/status/1162512607279890434
2200μFのコンデンサをM5Stackの3v3とGNDの間に入れてUSB挿抜テスト。ノーマルボトムでは成功、USB抜いてもリセットせずにそのまま動作しました。
Using google translate:
Insert a 2200μF capacitor between 3v3 of M5Stack and GND for USB insertion / extraction test. It succeeded in the normal bottom, and it worked as it was without resetting even if USB was removed. -
RE: Disable start-up beep
If it's not connecting to the device, what errors do you see? Paste your command line output here and maybe I can help further.
One other custom I did for ampy... I created the file ~/.ampy with these contents:
# Example .ampy file
# Please fill in your own port, baud rate, and delay
AMPY_PORT=/dev/tty.SLAB_USBtoUART
AMPY_BAUD=115200
# Fix for macOS users' "Could not enter raw repl"; try 2.0 and lower from there:
#AMPY_DELAY=0.5
If you create that file, you will not have to pass the port and baud rate options when running the ampy command. This is the standard way to run ampy when you don't have the .ampy file created.
world101$ ampy -p /dev/tty.SLAB_USBtoUART -b 115200 ls
/flash
Also, I was mistaken on the the v1.2.3 firmware with the beeps disabled by default. I just flashed one of my cores with the M5Burner and the beeps are there. I must have been running a custom firmware before.
-
RE: MQTT and Ui.Flow help needed
This one worked for me in the past. The username and active_key can be found on the "View AIO Key" link on io.adafruit.com. Make sure you have a feed named "light" set up under Feeds.

-
RE: [Solved]M5StickC firmware
No need to “roll back.” The M5burner is only for UIFlow IDE. To use it with Arduino, just connect the USB from the m5stickC to your computer and upload any Arduino .ino sketch from the m5stickC examples. Follow the instructions from @salty_good above to load the correct libraries into Arduino before uploading.
-
RE: Two cores broken?!
@felmue said in Two cores broken?!:
You'll need to manually enter setup and switch the mode to 'Internet Mode' again if you want to reconnect and continue on your program from within UIFlow.
Very nice and clear instructions 👍🏻
Regarding the manual setup, here is a hint. While the M5stack is booting with App mode set from before, hold down the button B (which shows two vertical dots “:” above it) and it should go directly into Internet mode, connect to WiFi, and then connect to the uiFlow cloud.