Navigation

    M5Stack Community

    • Register
    • Login
    • Search
    • Categories
    • Recent
    • Tags
    • Popular
    • Users
    • Groups
    • Search
    1. Home
    2. crami25
    3. Best
    C
    • Continue chat with crami25
    • Start new chat with crami25
    • Flag Profile
    • Profile
    • Following
    • Followers
    • Blocks
    • Topics
    • Posts
    • Best
    • Groups

    Best posts made by crami25

    • RE: [Solved] 5 RELAY Units on M5Stack device

      @M5StickFreakler

      You have to use the Pb-Hub unit, black connector of the relay units to the black connectors of the Pb-Hub (for analog and/or digital input/outputs, e.g. realys) . The Pa-Hub is used connecting i2c units (red connectors) with the same i2c address (e.g. to environment units).

      You can programm the 6 channels (analog or digital, equivalent to multiple Core-B channels) of the Pb-hub using blockly.

      good luck crami25

      posted in General
      C
      crami25
    • RE: Color Sensor RGB Unit (UI Flow) (TCS3472) Data

      Sorry it took me so long answering this question. I have been in contact with @Alf, and there seems to be a problem with the Adafruit_TCS34725.h library used for the M5Stack flow/blockly code. Here are the results and an instruction how to fix the measurements in order measuring (and displaying) reasonable data.

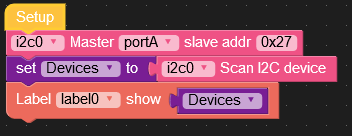
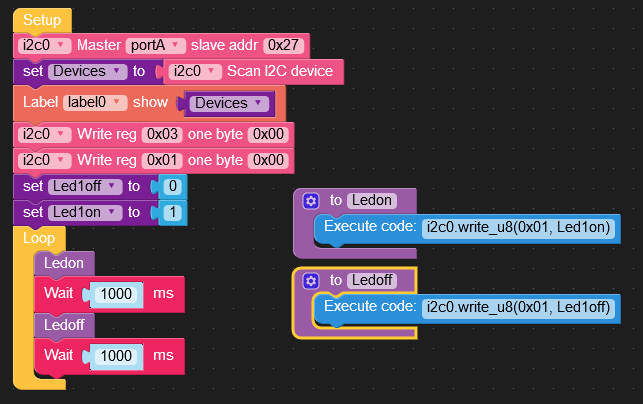
      As described in the example library for the color sensor hub I downloaded the following code for the flow/blockly environment to my M5Stack with the color hub attached:
      0_1584972593743_76edc618-c5ff-4396-90c2-519b13abd757-image.png
      Then I measured a piece of bright white paper and then a piece of dark black paper. The results of the readings of tmy measurement were:

      black => red: 176 green: 231 blue: 255
      white => red: 192 green: 235 blue: 255

      If the color HUB program would work correctly, the readings shoul be 0,0,0 for black and 255,255,255 for white !

      If you add a variable Rawdata to the program and display the readings in a label, 4 additional values are displayed: the raw readings for the 4 sensors of the TCS3472x in the color sensor HUB (white, red, green, blue). The readings for the sensors raw readings now were:
      0_1584972720882_96892546-d8dd-45e4-a9eb-d604a5246d0b-image.png

      black => white: 18270 red: 3000 green: 6528 blue: 7852
      white => white: 65535 red: 13892 green: 25465 blue: 30070

      Doing a bit of math using the raw data values you can then make the M5Stack display the correct (and expected) values for the RGB measurements.

      Because the leds of the Color Hub are always on, as @ajb2k3 correctly stated in his response, the sensor is affected by stray light from the leds By the way, M5Stack should make the Color sensor HUB casing black instead of white, diminishing the effect of stray light and also switching off the leds, when you are not taking any measurements.

      Putting the values read above into new values for the measurement into new values you can then correct the values of a color measurement in 4 Steps:

      Step 1:

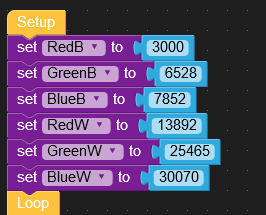
      You will have to enter the values of raw measurement you measured above for the RGB into new variables (you don't need the datas for clear):

      Raw values for black: RedB=3000 , GreenB=6528 , BlueB=7872
      Raw values for white: RedW=13892, GreenW=25465 , BlueW=30070
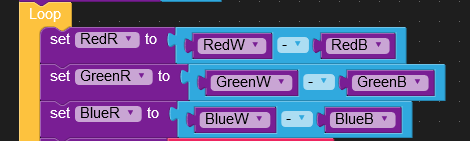
      0_1584972872890_abc42fa2-c5a5-4039-8deb-b92f40bdb021-image.png

      Step 3:

      Correct the white measurement datas subtracting the black data (correction for zero + stray light) . This corresponds to the range of measurements between black(minimum) and white (maximum):

      RedR=RedW-RedB , GreenR=GreenW-GreenB, BlueR=GreenW-GreenB
      0_1584972959782_65c12fdc-8221-4778-a594-222594bdf047-image.png

      Step 4:

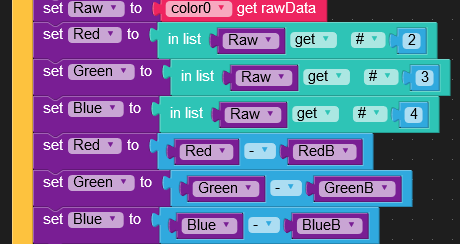
      Do the same for your measured values:
      Read the raw data for Red, Green, Blue (#2,3,4 of the Raw data list) and put them into variables for Red,Green,Blue. Subtract the values of black readings for the values of Red, Green, Blue
      0_1584973415811_9faed8d0-3ed3-4369-a186-39e1af69ddf0-image.png

      Step 5: Normalize the values

      In a normalized environment for color measurements the values for Red, Green, Blue should be in the range 0-255 corresponding to 0,0,0 for black and 255,255,255 for white

      So, for each color, you have to divide the values of the corrected mesurements by dividing the values of their corresponding ranges and the multplying the results by 255. In addition, you have to display the values as integers. (As alternative, you can multiply them by 100, then you get a measurement of 0-100% ).

      0_1584975284538_62e61b3d-abde-4111-9759-9c6c810c1bd2-image.png

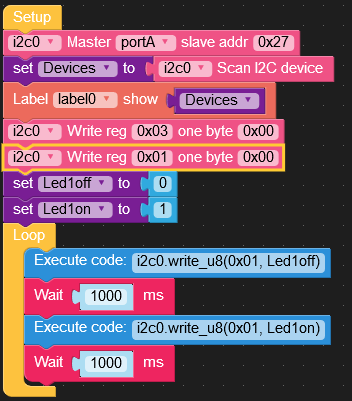
      This program shows the basic steps. I have used this procedure to determine the colors of smarties and building a smarties sorting machine together with @Alf using a 5MStack, the I2C color sensor HUB and 2 servos.

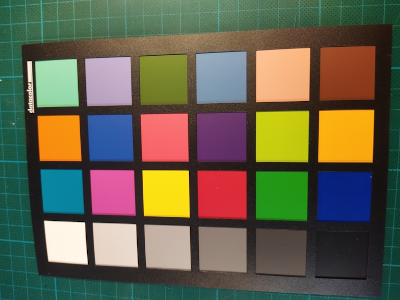
      Another project I will have will be implementing a precise RGB multi-point-calibration. In the example above, I assumed the color sensors for RGB to have a linear response curve. I reality that isn't the case. In the multi-point-calibration, as mentioned in the TCS_3472x data sheets explaining the calibration procedure , I will use a datacolor Spydercheckr24 color chart.
      0_1584974780729_Spyder.png

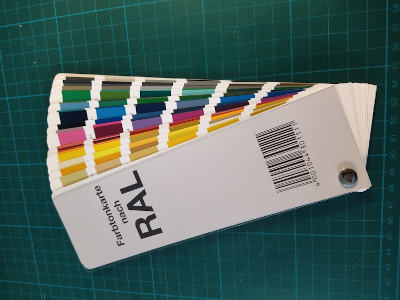
      A last project I have, will be using the M5Stack with the color sensor Hub first calibrating and then identifying the 213 classic RAL colors. The corresponding calibration table for the RGB values together with their RAL names will be stored on the microSD card of the M5Stack. In the measurement mode the RAL numbers, the corresponding names and RGB values will be displayed on the M5Stack display. Excel tables with Ral numbers, color names in different languages and their corresponding RGB values are available online, can be downloaded and converted to csv files before storing them on the M5Stack microSDcard. I will use the RAL shade map for calibration:

      0_1584974549962_dd019e60-fdef-4733-aab2-7d26a40aa94b-image.png

      Because the measurement may be varying with temperature and from sensor to sensor I made 2 improvements to my program:

      1: Take 10 measurements and display the mean RGB
      2: By pressing a Button on the M5Stack you can recalibrate the standard values for black and white with a piece of black and white paper and store them for RedB, GreenB, BlueB and RedW, GreenW and BlueW. That way, you don't have to rewrite and download your programm when you start the programm later or if you change the sensor.

      posted in Units
      C
      crami25
    • EXT.IO Unit and UIFlow 1.4.5.1

      I'm experimenting with M5Stack products (core, stick, atom matrix) and various I2C units (PbHUB, EXT.IO and Color) trying to use UIFlow and Blockly exclusively (instead of Arduino):
      As describet in the data sheets, all M5Stack I2C units have different fixed I2C addresses , PbHUB at 0x61, EXT.IO at 0x27. According to their M5Stack data sheets you can change the corresponding I2C addresses by modifying the address-pins of the EXT.IO unit PCA9554PW (0x20-0x27) or by flashing a new firmware to the PbHUP 328 microcontroller assigning any new I2C firmware address you want (0x00-7F) into the arduino code. By the way, I did that: flashing the firmware of the PbHUB to an arduino UNO. It worked and it behaved as a PbHUB in blockly. Showing that the communication between the master (M5Stack devices) and the slaves (PbHUB, EXT.IO) is working, I set up the simplest output experiment programming microcontrollers: letting a LED blink on output pin 1 of the slave (The basic Arduino "Hello Word" experiment): I hooked up a LED with a 470 Ohm protection resistor in serial between output 1 (IO1) and GND. The goal of my experiments was trying to set up the BLINK experiment in UIFlow/Blockly first using the "add UNIT" utility, later on using the I2C command of the advanced section of UIFlow/Blockly. I waned to use the latter beeing able hooking up grove type I2C sensors to port A of M5Stack masters, which are not (yet) available or defined for M5Stack block coding. One such application I'm working on, is the DS2482 I2C to onewire chip, which could be used to hook up the popular DS18B20 Sensor to all M5Stack devices having a I2C PortA using UIFlow blocks and connecting the sensors to the I2C PortA instead of using another M5Stack port mandatory forh the arduino or mycropython library. One wire devices also let you commuicate with sensors up to 1000m away, the maximum distance for I2C devices is only 100cm if you are lucky !

      For my experiments, I flashed the newest UIFlow 1.4.5.1 to my M5Stack core (black). It allows you to do the debugging on its screen. I downloaded the UIFlow/Blockly programs by WiFi or USB (comx Port) .

      In these comments I will show you step by step how it worked programming the EXT.IO.

      The first step was to attach the EXT.IO unit to portA and with short UIFlow program acting as a I2C scanner. The results showed that the i2C bus and the EXT.IO unit were responding. I used label0 on the M5Stack display:

      0_1586090844087_c99934e5-eb42-46e1-a39a-9e1de53116ac-image.png
      The dsplay showed "(39, 117)", 0x27 and 0x75 in hex, equivalent to the I2C addresses of the EXT.IO unit and IP5306 IC are responding .

      Then I added the EXT.IO unit in Blockly without modifying the code above:
      0_1586091782479_9ab2d0e1-6a75-4f1e-a113-9383123e1e53-image.png

      Downloading the program I got following error code on the M5Stack core display:
      ERROR
      I2C bus error (-1)
      So apparently something went wrong! Looking at the micropython code I discovered, that adding the EXT.IO unit, in addition to the code scanning and displaying the I2C devices following line was added to the Python program:

      ext_io2 = unit.get(unit.EXT_IO, unit.PORTA)

      Because my previous experiments with the color hub and the PbHUB didn't show this behavior, I figured out, that there must be a bug in the unit.get(unit.EXT_io,unitPORTA) library used in UIFlow 1.4.5.1. I erased my M5Stack core with the M5Stack burner (in Windows 10) and reflashed the core with UIFlow 1.4.5 and reloaded the program. Running the program showed no errors and worked as expected. So the bug for the EXT.IO unit library is only in the new UIFlow 1.4.5.1 and not in the 1.4.5 library.

      After that, I could finish my "Hello World" IO Test as mentioned above writing following code:
      0_1586093072429_2eff8001-f34e-458d-b2e6-23fe56f73b02-image.png

      In the next step, I wanted to say "Hello"/Blink using the advanced I2C blocks you also can usecommunicating with I2C devices using only blocks in UIFlow. You communicate with the I2C devices using their addresses and putting data in the appropriate registers.Looking at the data sheet for the PCA9554PW chip present in the EXT.IO unit, I used following data:
      - Address : 0x27
      - Configuration Register: 0x03 (ones for input zeroes for input)
      - Polarity Data Register: 0x02 (set to 0 by default, not used in this context))
      - Output Data Register: 0x01 (I used this for output to the blink pin)
      - Read Data Register: 0x00
      For my "Hello"/IO Blink at pin1 I had to set pin 1 of the PCA9554PW to an output in the configuration register (0x03), and the sending zeros(0x00) (Led off) and ones(0x01) (Led on) to the output data register(0x01). Here is my UIFlow code (for UIFlow 1.4.5):
      0_1586094601689_e3f4c8af-ae57-4828-9574-3e87a4ace635-image.png
      So far everything worked. I reflashed my M5Stack core with UIFlow 1.4.5.1 and I had no problem executing the code ("Hello" LED blinking) with the newest firmware. So the problem seems to be in the library ! I hope M5Stack will fix in the one of thenext updates (as well as with the color unit library, where I showed in another community blog how you could fix the readings of RGB using an appropriate UIFlow.

      Another feature I didn't like with the UIFlow I2C blocks is that you have to enter the adresses, registers and bytes as constant hex numbers into the advanced I2C blocks. It would be nice to use variables instead constants.I fixed this my way using the feature in UIFlow defining
      Execute blocks, where you can insert your own micropython code into custom created blocks.

      Looking at the block for the blink code:
      0_1586095431993_df1441ef-3fe9-4955-9e6a-433977b92291-image.png
      in micropython this translates to

      i2c0.write_u8(0x01, 0x01)

      I now added two variables <Led1off> and <Led1on> to tmy blocks, defined two execute blocks:
      code into the corresponding execute blocks:
      i2c0.write_u8(0x01, Led1off) and
      i2c0.write_u8(0x01, Led1on)
      Then setting <Led1off> to 0 and <Led1on> to 1 did the work. Here is the final code:

      0_1586096466309_a51f57ea-dcdc-4dfd-9c83-82ce3679dd8a-image.png

      You can also do some pretty"blocking" putting the IO commands in functions:

      0_1586096778748_c1f78b19-bfa6-46ca-9d18-892b55e2a687-image.png
      Hope my contributions to the community were useful !
      crami25

      posted in Units
      C
      crami25
    • RE: UIFlow .. multiple Weight Sensors with PaHUB?

      I don't think the PbHUB will work ... The PbHUB can only handle analog and digital signals (no clocks !). Reading values from the HX711 weight sensor needs a clock and a data line provided by the ESP32 GPIO Ports ... The UIFlow HX711 library only supports Port B.
      If you want to use several weight sensors on the M5Stack you will have to hook them up to different ports and do the programming either in Python or Arduino using the Expansion Port Module getting the additonal Ports C D and E.

      P.S: If you want to hook up multiple Weight Sensors to a M5Stack using port A you have to use HX711 devices which can be hooked up to the I2C bus. M5Stack has no such modules nor units, but you will find one made from DFRobot (https://wiki.dfrobot.com/HX711_Weight_Sensor_Kit_SKU_KIT0176). This sensor also has a grove I2C port and by modifying the I2C addresses you can hook up to 4 Weigh sensors to Port A. Using the PaHub I2C-extender you can even hook up 6 to 24 Weigh sensors ......

      posted in UIFlow
      C
      crami25
    • 4Relay Module UIFlow

      The M5Stack UIFlow libraries for 2Relay Module or the 4Relay Unit don't work for the 4Relay Module. So you have to use the I2C Master Blocks.

      Here is an example using the M5Stack Core toggling 3 Relays using the buttons A B C:

      0_1673535165986_4Relay.png
      0_1673535245682_Relais4.jpg

      UiFlow-Code (m5f): [https://forum.bastelgarage.ch/assets/files/2023-01-12/1673533548-943791-4relay6.zip)]

      posted in Review
      C
      crami25
    • RE: COM.X LTE (4G) Module Example UIFLOW/Phython

      @ajb2k3 A deaktivated PIN code doesn't mean that the SIM card is deactivated. SIM Cards are normally designed for cell phones and the provider gives you a new SIM Card locked with a PIN code and a PUK Code. (3-5 times entering a wrong PIN code blocks the SIM card and you have to enter the correct PUK code to unlock the SIM card. Entering a wrong PUK code several times will brick your SIM card and you have to get a new SIM card). Putting the SIM card into a cell phone the first time you will have to enter the SIM card PIN in order to unlock and to have access to the the SIM card. You can also use a PIN locked SIM card in an M5Stack GPRS/LTE module sending the right AT-command with the PIN required to unlock the SIM card. An easier way is to deactivate entering the PIN every time at startup with a cellphone: Put the new SIM card (per default locked with a PIN provided by the SIM card provider) in a cell phone, enter the PIN in order to access the SIM card. Then, in the cell phone setup menu: allow using the SIM card without entering the PIN code when you turn on the cell phone . (You normally protect the cell phone with a separate PIN code, so you don't want to enter 2 PIN codes every time you turn on your cell phone) . Now the "PIN-unlocked" SIM card can be used (and is active!) in an GPRS/LTE device without entering the PIN code. I have been using this routine regularly for the SIM-Cards I put in my GPRS/LTE WiFi mobile router, giving me internet access when I am away from home (I don't trust public [sniffing] WiFi networks ...).
      PS: Putting the SIM Card into a cell phone also allows you to change the PIN code provided with the SIM card eg. "1234" to "0000".

      posted in Modules
      C
      crami25