Realizing Voice Control for Robotic Arm Movement -M5Stack-base
-
Introduction:
In the movie "Iron Man, " we see Tony Stark communicating with the AI Jarvis while building equipment. Tony describes to Jarvis the parts he needs, and Jarvis controls robotic arms to assist Tony in completing the task. With the development of technology today, this kind of implementation is only a matter of time. Therefore, I decided to attempt to implement this function myself, using voice control to operate a robotic arm and achieve a simple application of artificial intelligence.
I was solely responsible for connecting and controlling the robotic arm and voice development board, triggering the movement of the robotic arm through specific commands. This was a challenging project because voice control technology involves multiple aspects, such as voice recognition, signal processing, and robot control, requiring me to learn and understand related knowledge. Through this article, I hope to share my project implementation process, achievements, and lessons learned, in order to inspire and assist fellow students working in the fields of robotics and voice control.
To implement this project, I first needed to solve two main problems: how to process voice signals and how to control the robotic arm.
Processing Voice Signals:
Steps for processing voice signals:
● Hardware selection: Choose a suitable development board (Arduino, Raspberry Pi, etc.).
● Microphone signal processing: Select a suitable microphone for collection, and convert the collected voice signal into a digital signal through an analog-to-digital converter.
● Signal processing: The collected signal is processed through noise reduction, filtering, etc. Useful features are extracted, and the feature signal is processed using a speech recognition algorithm to output a digital signal to the computer.
Controlling the Robotic Arm:
● Use a simple and easy-to-operate robotic arm.The above is the way to solve the two main problems. However, after research, developing a development board that can process voice signals requires a large amount of work! Fortunately, there are integrated voice development boards on the market now, and we can directly purchase one to use.
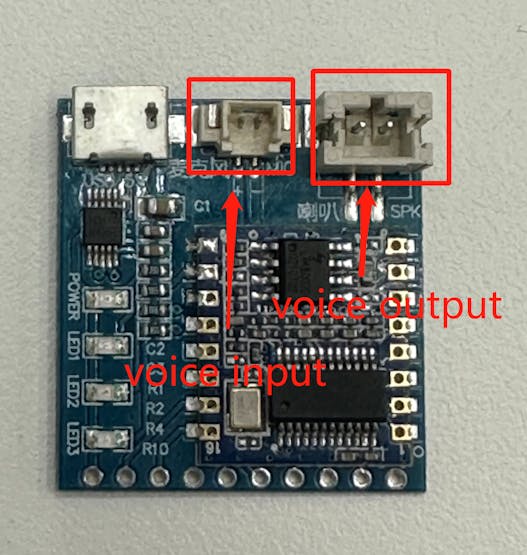
HLK-V20 Voice Development Board
The HLK-V20 development board is a sophisticated board with two IO interfaces - one for voice output and the other for voice input. It can be connected to a computer through a serial port.
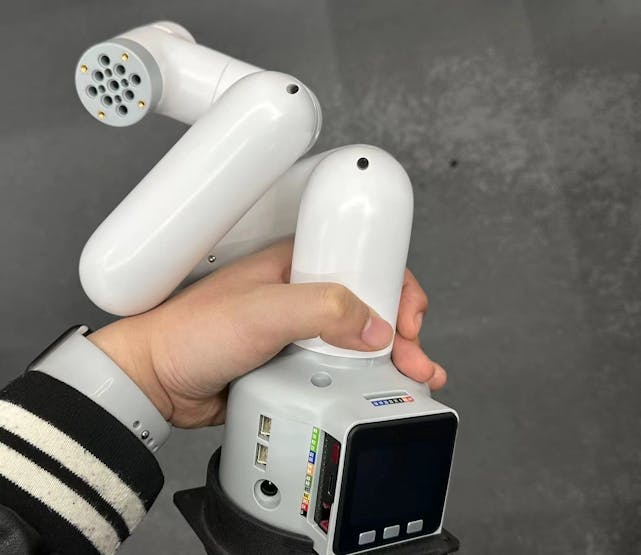
MyCobot 280 M5Stack 2023 Robotic Arm
For the robotic arm, I have chosen the popular desktop robotic arm, myCobot 280 M5Stack 2023, developed by Elephant Robotics. This robotic arm has recently undergone a significant software update, achieving a 20ms serial communication speed and offering rich interfaces compatible with popular programming languages such as Python and C++. I chose this robotic arm for several reasons, including its compact size, rich Python API interfaces (which I am skilled in programming), and ease of installation and use.
Development Environment
Programming language: Python 3.7+
Platform: Windows 11
Python libraries used: serial, pymycobot, time.
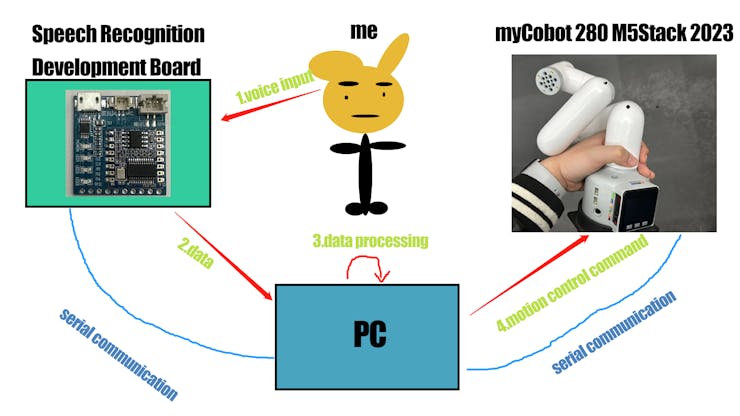
Development of the project
In the development of the project, there are four main steps involved:
● Speech input
● The development board retrieves the speech information and transfers it to the PC
● The PC processes the received information
● Sends motion control commands to the robotic arm for motion
Speech Recognition Development
To observe how the development board transfers data and what type of data it returns, the serial library in Python is used to operate the serial port. The library has methods to open, close, read, and write data from the serial port.
'''
For instance, the serial.Serial() method is used to open the serial port and connect it to the PC, while the serial.read() method reads the data transmitted from the serial port.
'''
import serial
s = serial.Serial("COM9",115200)
r = s.read()
while True:
print(r)
Here is the data that get from read().
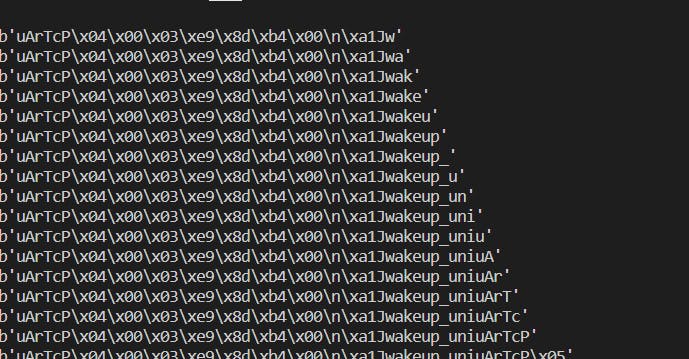
By analyzing the data transmitted from the development board, the wake-up word of the development board was identified as 'wakeup_uni', while the keyword 'uArTcp' indicates the start of the next command.It was discovered that the received data is concatenated together, and each time a command is inputted, it is concatenated with the previous one.
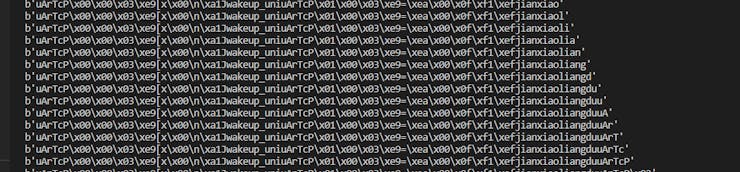
It was discovered that the received data is concatenated together, and each time a command is inputted, it is concatenated with the previous one. To check whether the development board has received the speech input, an if a in b: statement was used, with the input commands and their corresponding keywords being previously prepared. For instance, the wake-up word was set as "wakeup_uni", and 4 prompt words were set for testing purposes.#set prompt word hi_mycobot = b'openled' dancing = b'zengjialiangdu' nod_head = b'jianxiaoliangdu' go_back = b'closeled' # run frame while True: r += s.read() if wake_up in r: print("wake") wake = True r = b'' if wake and hi_mycobot in r: print("Hi myCobot") r = b'' if wake and dancing in r: print("dancing") r = b'' if wake and nod_head in r: print('nod your head') r = b'' if wake and go_back in r: print('Go back') r = b'' if wake and _exit in r: print("exit") r = b'' # print(r)sThis is the result of the test

Robotic Arm Control Development
The pymycobot library is a robotic arm API call interface library developed by Elephant Robotics. The specific usage method is on Gitbook (by Elephant Robotics).# import library from pymycobot import Mycobot import time # Create an instance object for later use mc = Mycobot('COM9',115200) #Control the mechanical arm to move at a speed of 70 according to the angle in the list,send_angles([angles],speed) mc.send_angles([0.87,(-50.44),47.28,0.35,(-0.43),(-0.26)],70) # Execute the next command after a delay of x seconds (the movement of the robotic arm takes time) time.sleep(x)Next, combine the two parts of the code together.
import serial
from pymycobot import MyCobot
import time
s = serial.Serial("COM6",115200)
mc = MyCobot('COM3',115200)
r = b''
wake_up = b'wakeup_uni'
_exit = b'exitUni'
hi_mycobot = b'openled'
dancing = b'zengjialiangdu'
nod_head = b'jianxiaoliangdu'
go_back = b'closeled'
wake = False
while True:
r += s.read()
if wake_up in r:
print("wake")
wake = True
r = b''
if wake and hi_mycobot in r:
print("Hi myCobot")
# say hi shake with you
mc.send_angles([0.87,(-50.44),47.28,0.35,(-0.43),(-0.26)],70)
time.sleep(1)
for count in range(3):
mc.send_angle(1,30,80)
time.sleep(1)
mc.send_angle(1,(-30),80)
time.sleep(1)
mc.send_angles([0,0,0,0,0,0],70)
r = b''
if wake and dancing in r:
print("dancing")
mc.send_angles([0,0,0,0,0,0],80)
time.sleep(1)
for count in range(2):
mc.send_angles([(-0.17),(-94.3),118.91,(-39.9),59.32,(-0.52)],80)
time.sleep(1.2)
mc.send_angles([67.85,(-3.42),(-116.98),106.52,23.11,(-0.52)],80)
time.sleep(1.7)
mc.send_angles([(-38.14),(-115.04),116.63,69.69,3.25,(-11.6)],80)
time.sleep(1.7)
mc.send_angles([2.72,(-26.19),140.27,(-110.74),(-6.15),(-11.25)],80)
time.sleep(1)
mc.send_angles([0,0,0,0,0,0],80)
r = b''
if wake and nod_head in r:
print('nod your head')
mc.send_angles([0,0,0,0,0,0],70)
time.sleep(1)
mc.send_angles([3.07,(-86.3),75.32,11.86,2.72,(-0.35)],70)
time.sleep(0.5)
for count in range(4):
mc.send_angle(4,13,70)
time.sleep(0.5)
mc.send_angle(4,(-60),70)
time.sleep(1)
mc.send_angle(4,13,70)
time.sleep(0.5)
mc.send_angles([0,0,0,0,0,0],70)
r = b''
if wake and go_back in r:
print('Go back')
mc.send_angles([12.83,(-138.95),156.09,(-12.3),(-12.91),35.41],70)
r = b''
if wake and _exit in r:
print("exit")
r = b''
Here is a video to show how it run.
https://youtu.be/X16pPnVCsHo
Experience and Lessons Learned
During the process of completing this project, I gained a lot of valuable experience and insights. Firstly, I realized that the completion of a project not only depends on the mastery of technology, but also requires prior research and understanding. When I was studying the production of a speech recognition development board, I found that the workload was very large and the implementation would be very difficult. However, there are already many mature technologies and tools available on the market. We only need to choose a reasonable combination and integration. Secondly, the successful completion of a project requires a clear framework and sufficient preparation. In this project, I needed to understand speech recognition algorithms, mechanical arm design and control technology, and master the use methods and performance characteristics of hardware equipment and software development tools.In this project, I successfully combined speech recognition technology with mechanical arm control technology to achieve voice control of the mechanical arm. Although the scale of this project is relatively small, it represents the application and development trend of artificial intelligence technology in real life. Although this is only a prototype of an AI project, its completion is a valuable experience for me. In future research, I will continue to explore more related information to further improve this project. If you have any good ideas, please leave a comment below.
-
Hi everyone, I want to integrate this development board into M5Stack-Basic. Is it possible? In other words, M5Stack has devices that support voice recognition.
-
WOW! The project looks interesting! Do you have ideas which are using the end-effector to complete some motion?
-
@kkkkkk Maybe, you can try M5stickC-plus