Image recognition and object grabbing with robotic arms
-
When we encounter image processing, we generally use OpenCV. When we install a camera for our robot, how should we deal with the communication between the camera and the robot? When the image recognition is successful, how does the robot move? Let’s share our project next. :grinning:
Project content: When the camera recognizes the image block, the robotic arm will go to grab the block and put it into the designated bucket.
The next step involves ros, python, OpenCV, and other technologies.
First, we set up our scene like this.
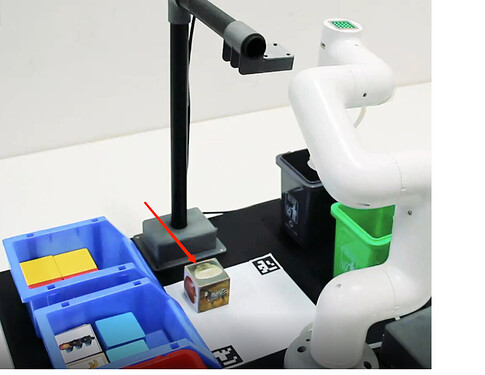
The robot model has been built in the ros environment, and then we run the code.
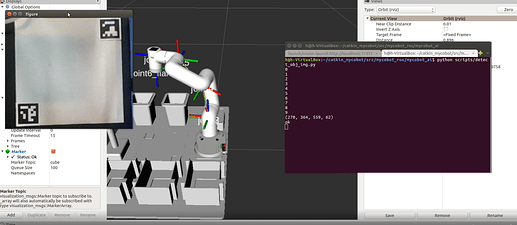
When the target object appears
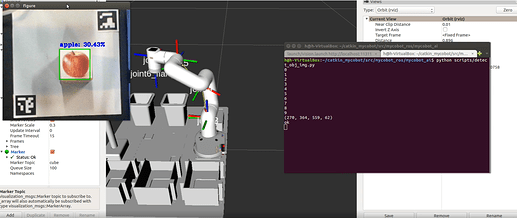
We need to identify the content of the target image and draw a border for it, and then determine its position
core code:def obj_detect(self, img, goal):
i = 0
MIN_MATCH_COUNT = 10
sift = cv2.xfeatures2d.SIFT_create()# find the keypoints and descriptors with SIFT kp = [] des = [] for i in goal: kp0, des0 = sift.detectAndCompute(i, None) kp.append(kp0) des.append(des0) # kp1, des1 = sift.detectAndCompute(goal, None) kp2, des2 = sift.detectAndCompute(img, None) # FLANN parameters FLANN_INDEX_KDTREE = 0 index_params = dict(algorithm=FLANN_INDEX_KDTREE, trees=5) search_params = dict(checks=50) # or pass empty dictionary flann = cv2.FlannBasedMatcher(index_params, search_params) x, y = 0, 0 try: for i in range(len(des)): matches = flann.knnMatch(des[i], des2, k=2) # store all the good matches as per Lowe's ratio test. 根据Lowe比率测试存储所有良好匹配项。 good = [] for m, n in matches: if m.distance < 0.7*n.distance: good.append(m) # When there are enough robust matching point pairs 当有足够的健壮匹配点对(至少个MIN_MATCH_COUNT)时 if len(good) > MIN_MATCH_COUNT: # extract corresponding point pairs from matching 从匹配中提取出对应点对 # query index of small objects, training index of scenarios 小对象的查询索引,场景的训练索引 src_pts = np.float32( [kp[i][m.queryIdx].pt for m in good]).reshape(-1, 1, 2) dst_pts = np.float32( [kp2[m.trainIdx].pt for m in good]).reshape(-1, 1, 2) # Using matching points to find homography matrix in cv2.ransac 利用匹配点找到CV2.RANSAC中的单应矩阵 M, mask = cv2.findHomography( src_pts, dst_pts, cv2.RANSAC, 5.0) matchesMask = mask.ravel().tolist() # Calculate the distortion of image, that is the corresponding position in frame 计算图1的畸变,也就是在图2中的对应的位置 h, w, d = goal[i].shape pts = np.float32( [[0, 0], [0, h-1], [w-1, h-1], [w-1, 0]]).reshape(-1, 1, 2) dst = cv2.perspectiveTransform(pts, M) ccoord = (dst[0][0]+dst[1][0]+dst[2][0]+dst[3][0])/4.0 cv2.putText(img, "{}".format(ccoord), (50, 60), fontFace=None, fontScale=1, color=(0, 255, 0), lineType=1) print(format(dst[0][0][0])) x = (dst[0][0][0]+dst[1][0][0] + dst[2][0][0]+dst[3][0][0])/4.0 y = (dst[0][0][1]+dst[1][0][1] + dst[2][0][1]+dst[3][0][1])/4.0 # bound box 绘制边框 img = cv2.polylines( img, [np.int32(dst)], True, 244, 3, cv2.LINE_AA) # cv2.polylines(mixture, [np.int32(dst)], True, (0, 255, 0), 2, cv2.LINE_AA) except Exception as e: pass if x+y > 0: return x, y else: return NoneAfter the recognition function is completed, it is necessary to calculate the distance between the target image and the real robot arm.
core code:calculate params of the coords between cube and mycobot
    if nparams < 10:
        if detect.get_calculate_params(frame) is None:
            cv2.imshow("figure", frame)
            continue
        else:
            x1, x2, y1, y2 = detect.get_calculate_params(frame)
            detect.draw_marker(frame, x1, y1)
            detect.draw_marker(frame, x2, y2)
            detect.sum_x1 += x1
            detect.sum_x2 += x2
            detect.sum_y1 += y1
            detect.sum_y2 += y2
            nparams += 1
            continue
    elif nparams == 10:
        nparams += 1
        # calculate and set params of calculating real coord between cube and mycobot
        detect.set_params(
            (detect.sum_x1+detect.sum_x2)/20.0,
            (detect.sum_y1+detect.sum_y2)/20.0,
            abs(detect.sum_x1-detect.sum_x2)/10.0 +
            abs(detect.sum_y1-detect.sum_y2)/10.0
        )
        print "ok"
        continue
def get_calculate_params()
This method is to calculate the center position of the aruco code, which is the center position of the camera image.After the calculation, we need to move the robotic arm to grab the target object, and use the API from our own pymycobot library to control the movement of the robotic arm:
core code:Grasping motion
def move(self, x, y, color):
    # send Angle to move mycobot
    self.pub_angles(self.move_angles[0], 20)
    time.sleep(1.5)
    self.pub_angles(self.move_angles[1], 20)
    time.sleep(1.5)
    self.pub_angles(self.move_angles[2], 20)
    time.sleep(1.5)
    # send coordinates to move mycobot
    self.pub_coords([x, y, 165,  -178.9, -1.57, -66], 20, 1)
    time.sleep(1.5)
    # 根据不同底板机械臂,调整吸泵高度
    if "dev" in self.robot_m5 or "dev" in self.robot_raspi:
        # m5 and raspi
        self.pub_coords([x, y, 90,  -178.9, -1.57, -66], 25, 1)
    elif "dev" in self.robot_wio:
        h = 0
        if 165 < x < 180:
            h = 10
        elif x > 180:
            h = 20
        elif x < 135:
            h = -20
        self.pub_coords([x, y, 31.9+h,  -178.9, -1, -66], 20, 1)
    elif "dev" in self.robot_jes:
        h = 0
        if x < 130:
            h = 15
        self.pub_coords([x, y, 90-h,  -178.9, -1.57, -66], 25, 1)
    time.sleep(1.5)
    # open pump
    if self.raspi:
        self.gpio_status(True)
    else:
        self.pub_pump(True, self.Pin)
    time.sleep(0.5)
    self.pub_angles(self.move_angles[2], 20)
    time.sleep(3)
    self.pub_marker(
        self.move_coords[2][0]/1000.0, self.move_coords[2][1]/1000.0, self.move_coords[2][2]/1000.0)

    self.pub_angles(self.move_angles[1], 20)
    time.sleep(1.5)
    self.pub_marker(
        self.move_coords[3][0]/1000.0, self.move_coords[3][1]/1000.0, self.move_coords[3][2]/1000.0)

    self.pub_angles(self.move_angles[0], 20)
    time.sleep(1.5)
    self.pub_marker(
        self.move_coords[4][0]/1000.0, self.move_coords[4][1]/1000.0, self.move_coords[4][2]/1000.0)
    print self.move_coords[color]
    self.pub_coords(self.move_coords[color], 20, 1)
    self.pub_marker(self.move_coords[color][0]/1000.0, self.move_coords[color]
                    [1]/1000.0, self.move_coords[color][2]/1000.0)
    time.sleep(2)
    # close pump
    if self.raspi:
        self.gpio_status(False)
    else:
        self.pub_pump(False, self.Pin)
    time.sleep(1)
    if color == 1:
        self.pub_marker(
            self.move_coords[color][0]/1000.0+0.04, self.move_coords[color][1]/1000.0-0.02)
    elif color == 0:
        self.pub_marker(
            self.move_coords[color][0]/1000.0+0.03, self.move_coords[color][1]/1000.0)
    self.pub_angles(self.move_angles[0], 20)
    time.sleep(3)
move_angles()
This method is the API of the mobile manipulator.
In conclusion:
The first step is to identify the target.
The second step is to calculate the distance between the end of the real robot arm and the target.
The third step moves the robotic arm to complete a series of movements and finally grab the target object and move it into a bucket.
The complete code is on GitHub:
https://github.com/elephantrobotics/mycobot_ros/tree/noetic/mycobot_aiMainly run mycobot_ros/mycobot_ai/launch/vision.launch and
mycobot_ros/mycobot_ai/scripts/detect_obj_img.py
The main function of vision.launch is to build a 1:1 real scene.
The main function of detect_obj_img.py is to realize image recognition and capture.
Video demo:
DEMO
Our project is using mycobot280 M5stack -
I see you are using a non m5stack camera.
could you use the StickV or UnitV for some of the image recognition? -
We use M5stack basic as our main controller, we can connect any camera. It only needs to adapt to the camera of StickV or UnitV to complete the recognition.