Ways to add external battery
-
Dear M5Stack community,
I would like to add a little lipo battery to the m5stickc and I'm very space-limited (i.e. I can't use the 18650 extension). So I was wondering if I could use a standard 3.7V lipo pack and hook it up to one of the ports. Specifically, there are
- EXT_VDD on the HYP2.0/grove connector
- EXT_VDD on the HAT (
5V ->) - VBUS_VIN on the HAT (
5V <-) - VBAT_Li_Ion on the HAT (
BAT) - VBUS_USB on the USB-C port
(according to the schematic: https://m5stack.oss-cn-shenzhen.aliyuncs.com/resource/docs/schematic/Core/M5StickC/m5stickC.webp)
Now to which one of these can I connect a lipo battery and have it recognized by the AXP? Or do I have to desolder the internal battery for that to work?
-
In yoir case the best option is a connect externall battery to gnd and vbat on hat port and remove internall battery. But opening m5stick withoit damage internal connection is some difficult. I opened it once to remove magnets and i dont doing this again. Axp is settings default to charge battery with 100mA current, so if you connect bigger capacity battery it will default charge in longer time ( it is safe for battery).
I saw command in uiflow to change axp charge current to predefined values, but i dont test it if this change is permament or you need change this everyvrestartvof device. -
Thanks @robalstona! That's a great pointer. I think I found the code to set the charge current (I use C++/Arduino code): https://github.com/m5stack/M5StickC/blob/master/src/AXP192.cpp#L470
I'll order the new batt, try this out and post my findings here. -
Success!
@robalstona your advice was spot-on. For future reference, here's what I did:
- Disassemble the M5StickC:
- peel the sticker at the bottom from the GPIO pins, do NOT fully remove it
- use a sharp tool to pry away the black GPIO pin block, forward in the direction that the "5V->" arrow indicates on the sticker that was on it.
- open the case with a hex tool
- gently lift and pull out the board
- The battery is attached to 3 different pins: VBATT (red) + GND (black) on the main board and VBATT (red as well) on the extension board/GPIO pins. Cut or desolder the connections on the main board but cut the red wire on the extension board as close as possible to the battery. Then solder the dangling end of this red wire back to VBATT on the main board. Otherwise the new battery cannot be connected via the GPIO pins.
- Now put everything back together in reverse order (first put in the board, then put the GPIO pin cover on, then reattach the sticker)
- Now plug an external 3.7V LiPo battery into the GPIO pins, connected with (-) to GND and (+) to VBATT.
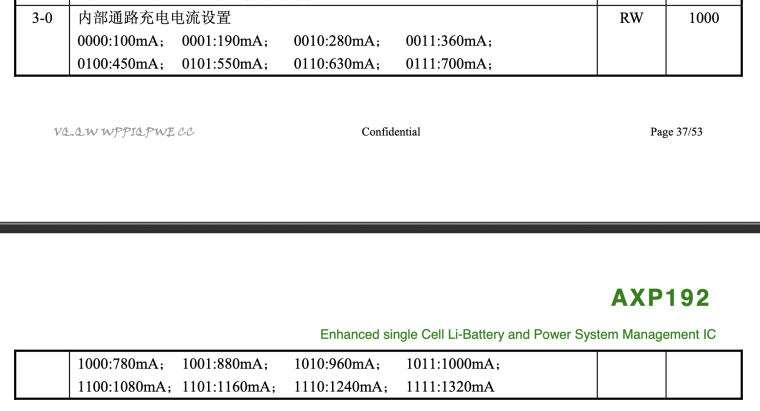
- In my case, the external battery is ~1000 mAh, and I read somewhere that you should charge your lipo batteries with 10% of the mAh rating, so I left the default charging current of 100mA. If using a bigger battery or you want to use higher charge current, then use this command: https://github.com/m5stack/M5StickC/blob/master/src/AXP192.cpp#L470 but keep in mind that you can't use arbitrary currents. You have to pick one of the currents that's compatible with the AXP192 (source: https://usermanual.wiki/Document/axp192xpowers.109566177):
- Disassemble the M5StickC:
-
This post is deleted! -
Hi@robalstona,
I have a 3.7V 2600mAh Li-Po battery which I want to directly connect to the M5StickPlus. I do not need to recharge the Li-Po battery since its for a one-off event and I just need the M5StickPlus to last for a few hours. Can I just directly connect the V+ of the battery to the BAT pin of the M5StickPlus, and the V- to GND? Is it safe for the M5StickPlus? Do I need to remove the internal 120mAh battery inside the M5Stick?
-
@sloflo Thanks for this tear down guide for the M5StickC Plus, it was very helpful!
-
Another option is to set a 3 pin switch between + in both batteries and select that you want to use.
Hello! It looks like you're interested in this conversation, but you don't have an account yet.
Getting fed up of having to scroll through the same posts each visit? When you register for an account, you'll always come back to exactly where you were before, and choose to be notified of new replies (either via email, or push notification). You'll also be able to save bookmarks and upvote posts to show your appreciation to other community members.
With your input, this post could be even better 💗
Register Login