Transforming Camera Angles with Robotic Arm Technology
-
Introduction
Have you ever encountered a situation like this: when you're ready to shoot a video with your smartphone or camera, you've already envisioned the perfect shot in your mind, but due to practical limitations, you can't capture the angle you desire? This situation can be frustrating. For example, if you want to shoot from the perspective of an ant on the ground, the lens needs to be on the same level as the ant, which is not only difficult in practice but often hard to achieve.
Although there are many stabilizing devices on the market, such as gimbal stabilizers, to assist in achieving steady and multi-angle shooting effects, in this article, I will explore a unique solution: mounting the smartphone on the end of a robotic arm to shoot, aiming to capture those special viewpoints that traditional methods struggle to grasp. This attempt is not only designed to overcome the physical limitations encountered during the shooting process but also hopes to innovate technologically to expand our imagination and practice of photography angles.
https://www.youtube.com/watch?v=xXq9_Nu9djs
Equipment
myCobot 320 M5stack
The myCobot 320, a collaborative robot arm with six degrees of freedom, has become a highlight in its field thanks to its unique design and high-precision servo motors. This robotic arm has a maximum working radius of 350mm and a maximum end load capacity of 1000g, making it suitable for a wide range of application scenarios. The myCobot 320 not only supports flexible visual development applications but also provides in-depth analysis of mechanical motion principles, offering users 12 standard 24V industrial IO interfaces to meet various development needs.
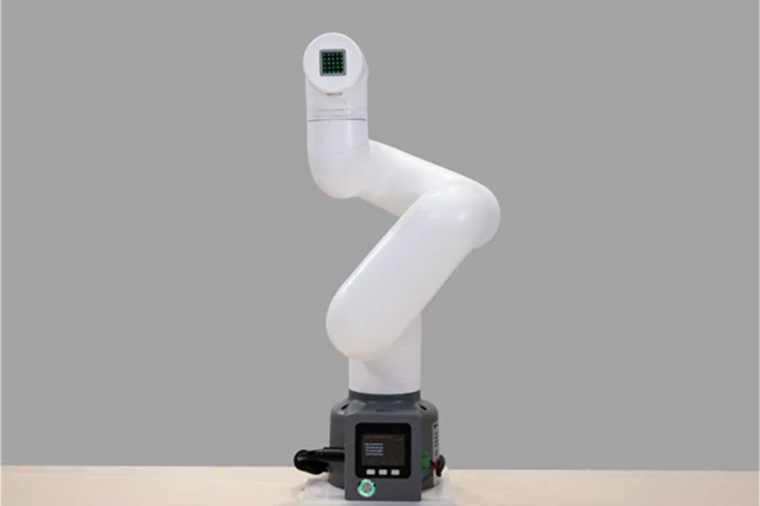
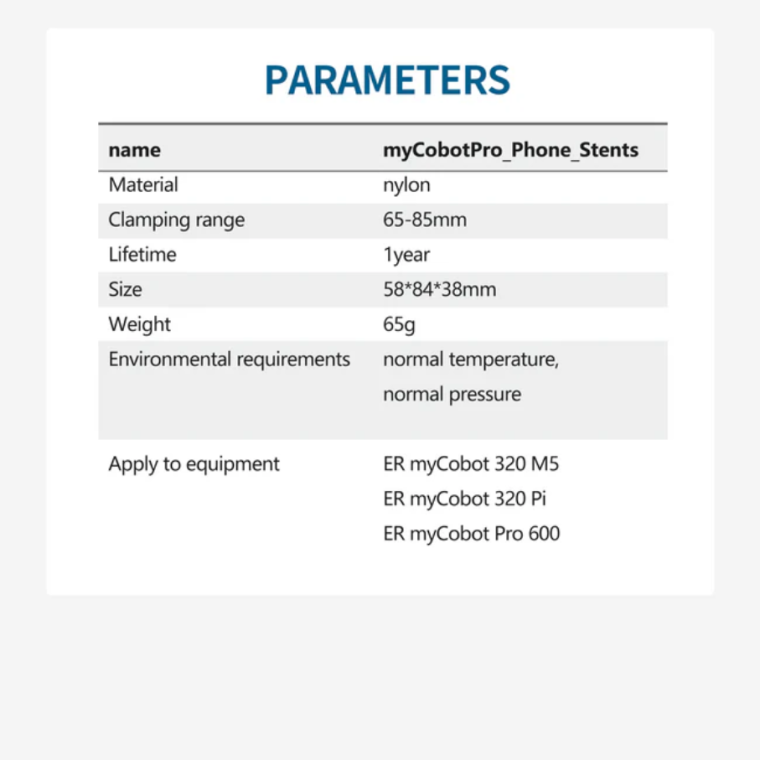
Its openness is extremely high, compatible with most mainstream operating systems and programming languages, including Python and ROS, offering developers a great deal of flexibility and freedom. Whether in education, research and development, or industrial applications, the myCobot 320 provides strong support, making innovation and application development more convenient and efficient.myCobot Pro Phone Holder
It can be mounted on the end of the myCobot 320 and myCobot Pro 630 robotic arms, capable of securely holding a smartphone in place.

Initial Attempt
Installing the Phone Holder
https://youtu.be/QvcSwkRnooYShooting Video
Programming joint control for the robotic arm, let's see how it performs.
https://youtu.be/b-FiXHTFsrw
Although the robotic arm's movement trajectory shown in the video appears simple, in reality, adjusting these trajectory points still requires a considerable amount of time, and the results may not always be ideal. Therefore, I am considering whether there is a better solution, such as setting several motion modes and pre-planning the robotic arm's shooting path. This would not only make effective use of the robotic arm to assist in shooting but also provide a more efficient deployment method.Programming Challenge
Development Needs Analysis
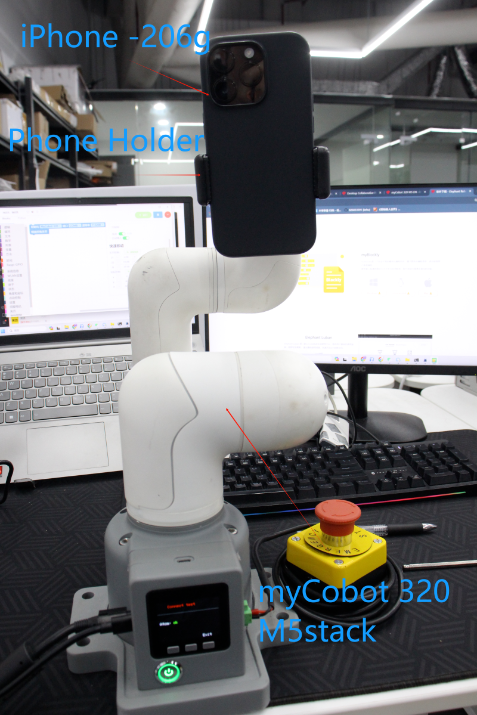
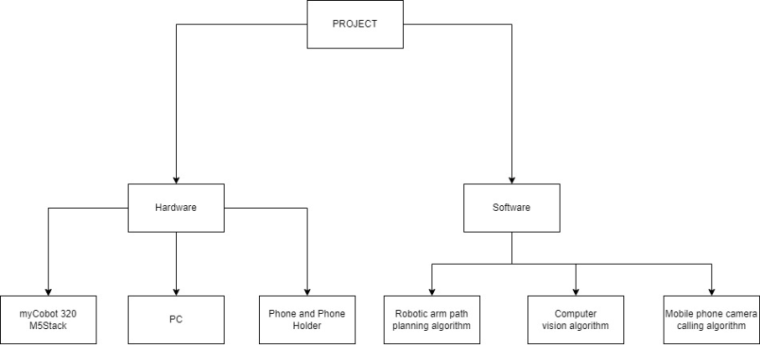
The equipment to be used is as follows:
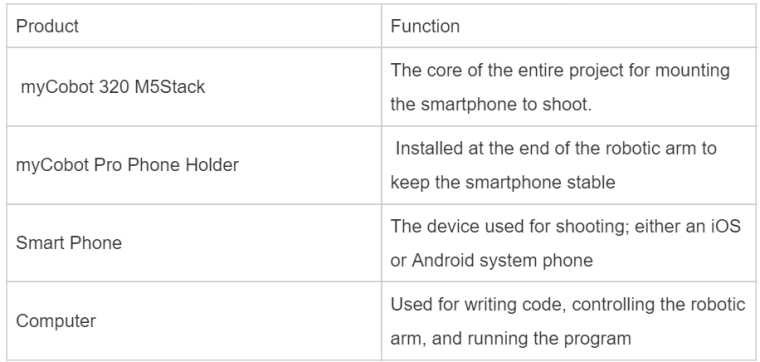
Requirements Optimization:
The goal is to design a series of innovative video shooting methods for static objects. The initial plan adopts three approaches:- Using the smartphone fixed at the end of the robotic arm to achieve 360° panoramic video shooting of the object.
- Creating a visual effect that smoothly advances from a distance to close to the object, simulating a "zoom-in" effect.
- Achieving rapid rotation and movement at the end of the robotic arm to capture dynamic scenes.
To precisely control the shooting process, the plan is to utilize OpenCV machine vision algorithms and the AVFoundation iOS framework, controlling the exact movements of the robotic arm with Python scripts. We will identify the dimensions of the object through the smartphone camera, thereby calculating the ideal distance between the end of the robotic arm and the object. Based on this distance, we will design a corresponding robotic arm movement algorithm to ensure the best visual effects during the shooting process.
YOLOv5 Vision Algorithm
To save time, we will not train the machine vision algorithm ourselves to recognize specific objects. Instead, we will directly use the YOLOv5 library, which has been trained and optimized by other developers, to achieve accurate detection of target objects.
import cv2
import torch
from pathlib import Path
from models.experimental import attempt_load
from utils.general import non_max_suppression, scale_coords
from utils.torch_utils import select_device, time_synchronized

def detect_apples(img_path):
    device = select_device('')
    weights = 'yolov5s.pt'
    model = attempt_load(weights, map_location=device)
    img0 = cv2.imread(img_path)  # BGR
    img = img0[:, :, ::-1]  # RGB
    img = torch.from_numpy(img).to(device)
    img = img.float()  # uint8 to fp16/32
    img /= 255.0  # 0 - 255 to 0.0 - 1.0
    if img.ndimension() == 3:
        img = img.unsqueeze(0)

    # Inference
    t1 = time_synchronized()
    pred = model(img)[0]
    # Apply NMS
    pred = non_max_suppression(pred, 0.4, 0.5, classes=None, agnostic=False)
    t2 = time_synchronized()
    print(f'Inference time: {(t2 - t1):.3f}s')

    # Process detections
    for i, det in enumerate(pred):  # detections per image
        gn = torch.tensor(img0.shape)[[1, 0, 1, 0]]  # normalization gain whwh
        if len(det):
            det[:, :4] = scale_coords(img.shape[2:], det[:, :4], img0.shape).round()
            for *xyxy, conf, cls in reversed(det):
                label = f'{model.names[int(cls)]} {conf:.2f}'
                plot_one_box(xyxy, img0, label=label, color=(255, 0, 0))
    return img0

def plot_one_box(xyxy, img, color=None, label=None, line_thickness=None):
    # Plots one bounding box on image img
    tl = (
        line_thickness or round(0.002 * max(img.shape[0:2])) + 1
    )  # line/font thickness
    color = color or [random.randint(0, 255) for _ in range(3)]
    c1, c2 = (int(xyxy[0]), int(xyxy[1])), (int(xyxy[2]), int(xyxy[3]))
    cv2.rectangle(img, c1, c2, color, thickness=tl, lineType=cv2.LINE_AA)
    if label:
        tf = max(tl - 1, 1)  # font thickness
        t_size = cv2.getTextSize(label, 0, fontScale=tl / 3, thickness=tf)[0]
        c2 = c1[0] + t_size[0], c1[1] - t_size[1] - 3
        cv2.rectangle(
            img, c1, c2, color, -1, cv2.LINE_AA
        )  # filled
        cv2.putText(
            img,
            label,
            (c1[0], c1[1] - 2),
            0,
            tl / 3,
            [225, 255, 255],
            thickness=tf,
            lineType=cv2.LINE_AA,
        )
    return img

if __name__ == '__main__':
    img_path = 'apple.jpg'
    result_img = detect_apples(img_path)
    cv2.imshow('Result', result_img)
    cv2.waitKey(0)
    cv2.destroyAllWindows()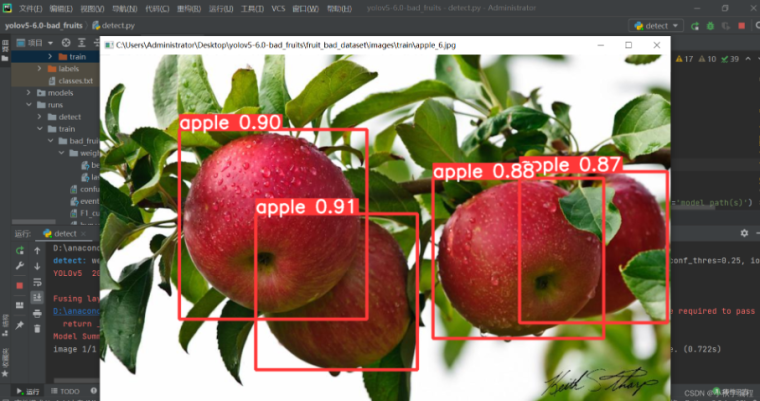
Robotic Arm Motion Control Algorithm
Methods for controlling the robotic arm:This method controls the movement of the robotic arm's joints.
mc.send_angles([angle_list],speed)
# This method uses coordinates to control the robotic arm's movement in space.
mc.send_coords([coords_list],speed,mode)
example:
mc.send_angles([0,0,0,0,0,0],100)
time.sleep(2)
mc.send_coords([(-3.6), 30.32, (-45.79), (-46.84), 97.38, 0.35],100,1)
After obtaining the dimensions of the object, define a reasonable position for the end of the robotic arm relative to the object.
def calculate_angles_for_distance(distance):
    #Calculate the joint angles of the robotic arm based on the ideal distance.
    # The calculations here need to be adjusted based on actual conditions and physical parameters
    return [0, -10, distance * 0.1, 0, 30, 0]

def calculate_adjusted_angles(action_angles):
    # Calculate new angles based on the coordinate adjustments that may be needed after a specific action
    # This is just an example, and the specific logic should be adjusted as needed.
    return [angle * 1.1 for angle in action_angles]
Then select the motion control corresponding to the chosen mode.
#For 360° Panoramic Shooting:
# Define the specific shooting mode
def shoot_mode_360(ideal_distance):
    print("excuse 360")
    # First, move to the ideal shooting position.
    move_to_ideal_position(ideal_distance)
    # Handle the ideal distance.
    ideal_ratio =  ratio
    # Perform the specific actions for 360° panoramic shooting.
    mc.send_angles([0, 0, 0, 0, 0, 0], speed=15)
    time.sleep(1)
    mc.send_coords([angle * ratio for angle in angles_list]
,15)
    time.sleep(1)
    mc.send_coords([angle * ratio for angle in angles_list]
,15)
    time.sleep(1)
    mc.send_coords([angle * ratio for angle in angles_list]
,15)
Invoking the Smartphone Camera
In the development process, as I attempted to invoke the smartphone camera interface to realize the automatic shooting function, I encountered a series of challenges. As my first deep exploration into the AVFoundation iOS framework, with the goal of activating and controlling the smartphone's camera, I found that I had not yet fully succeeded in implementing this function. The current difficulties mainly focus on how to accurately call the camera for video shooting and how to compensate for possible image stretching during the shooting process through software adjustments, which requires precise control over the movement of the robotic arm. These issues mark the direction of my subsequent research and require me to continue delving into the use of the AVFoundation framework, especially its specific methods for controlling the camera, and explore how to integrate these controls into the adjustment of the robotic arm's movement to ensure the video quality meets expectations.
Summary
As this project record comes to an end, I realize that although there are many areas for improvement, attempting to make two independent devices work together under different frameworks has been a valuable experience for me. Indeed, the entire project has not yet reached the ideal state in my mind. However, I believe the direction explored by this project has great potential, considering that there are already professional photography robotic arms on the market capable of producing impressive results, which reinforces my belief in the potential value of the project.
The application of robotic arms has already permeated our daily lives, playing an increasingly important role whether in industrial production, daily services, or in the field of artistic creation. With the continuous advancement and popularization of artificial intelligence technology, the combination of AI and robotics will undoubtedly become an important trend in the future development of technology. I have great expectations for the future development of robotics technology and believe that they will display amazing capabilities and creativity in more fields in the future.
If you are interested in my project, or have any ideas and suggestions, I warmly welcome your communication. Your feedback will provide valuable help for me to continue improving and perfecting this project.