Lesson 5. TF. Markdown web server
-
The purpose of this lesson
Hi! Today we will learn how to work with TF-card. One day in one of the lessons we learned how to raise a web server, but today we want more than just to give the text to the client. Markdown. A lightweight markup language created with the purpose of writing maximally readable and easy to edit text, but suitable for conversion to languages for advanced publications (HTML, Rich Text, etc.). We will write a Markdown Web server on the basis of M5STACK (Fig. 1).

Figure 1.
When the device is turned on, the user will be prompted to insert a memory card. The following files will be located on the memory card:
- a file with a known Wi-Fi networks (Wi-Fi.ini);
- the style file (style.css);
- A JS library that renders Markdown text (markdown.js);
- at the root of the memory card will be custom markdown files (*.md), which will be available to customers (Fig. 1.1).
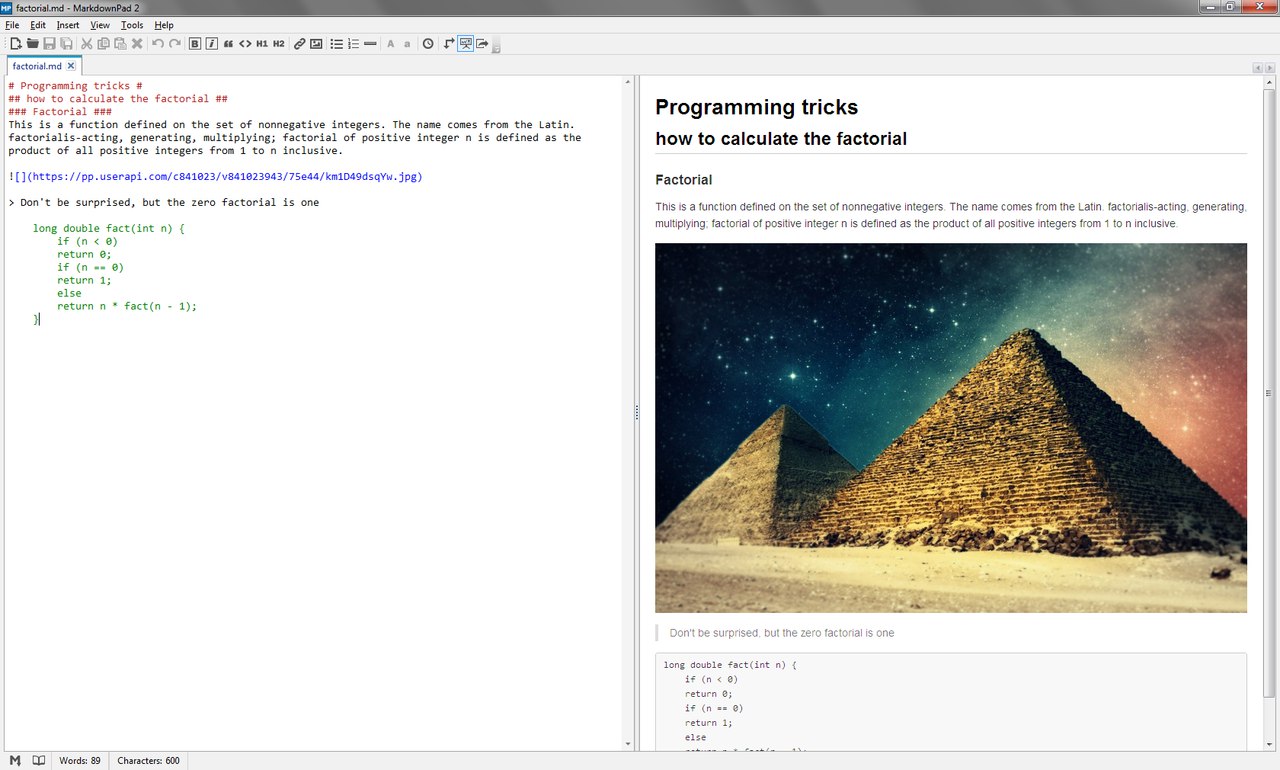
Figure 1.1. Markdown editor
After the user inserts the memory card, the device must be restarted.
At startup, the device will download the Wi-Fi settings from the memory card and try to connect to the first available network. The device will then display the IP address on the screen. In order to view a web page you must use a modern browser that supports JS and CSS.Short help
MicroSD-memory card format (Fig. 2) designed for use in portable devices. Today it is widely used in digital cameras and video cameras, mobile phones, smartphones, e-books, GPS-navigators and M5STACK.

Figure 2. microSD
More information is available on Wikipedia https://en.wikipedia.org/wiki/Secure_Digital
List of components for the lesson
- M5STACK;
- USB-C cable from standard set ;
- 4GB MicroSD memory card.
Begin!
Step 1. Draw pictures
We'll need images to visualize the processes. Use any graphics editor convenient for you. We will use Paint (Fig. 3, 3.1).

Figure 3.

Figure 3.1
Similarly, draw icons: "insert memory card", "views", "failure", "timer" (Fig. 3.2). Next, we will make them arrays of pixels using the Converter (the link is given below in the Download section).

Figure 3.2. Collection of drawings for the project
In the future, we will connect the images to our new project:
extern unsigned char timer_logo[];
extern unsigned char insertsd_logo[];
extern unsigned char error_logo[];
extern unsigned char wifi_logo[];
extern unsigned char views_logo[];
Step 2. Wi-Fi client
One day, in one of the lessons we learned how to raise a Wi-Fi hotspot with a web server http://forum.m5stack.com/topic/60/lesson-3-1-wi-fi-access-point
A distinctive feature of today's lesson is the Wi-Fi mode - we will use the "client" mode (Fig. 4).

Figure 4. Wi-Fi in client mode
WiFi.begin(char* ssid, char* password);Step 3. Preparing the memory card for use
Initialize an instance of the SD class, and at the same time check whether the memory card is installed in the slot or not.
if (!SD.begin())
{
	M5.Lcd.fillRoundRect(0, 0, 320, 240, 7, 0xffff);
	M5.Lcd.drawBitmap(50, 70, 62, 115, (uint16_t *)insertsd_logo);
	M5.Lcd.setCursor(130, 70);
	M5.Lcd.print("INSERT");
	M5.Lcd.setCursor(130, 90);
	M5.Lcd.print("THE TF-CARD");
	M5.Lcd.setCursor(130, 110);
	M5.Lcd.print("AND TAP");
	M5.Lcd.setCursor(130, 130);
	M5.Lcd.setTextColor(0xe8e4);
	M5.Lcd.print("POWER");
	M5.Lcd.setTextColor(0x7bef);
	M5.Lcd.print(" BUTTON");
	while(true);
}
Step 4. Read the file from the memory card
In order to read data from the memory card, it is necessary to call the open method of the SD class, previously passing it as the char* argument with the file address.
String TFReadFile(String path) {
	File file = SD.open(strToChar(path));
	String buf = "";
	if (file)
	{
    	while (file.available())
    	{
      		buf += (char)file.read();
    	}
    	file.close();
  	}
  	return buf;
}
Working with pointers is not very convenient for us, so we will write a simple function for" converting " String to char*:
char* strToChar(String str) {
	int len = str.length() + 1;
	char* buf = new char[len];
	strcpy(buf, str.c_str());
	return buf;
}
Function TFReadFile takes as a String argument the address of the file, tries to read it, and returns the file contents as a String, if the file read does not work, the function will return an empty string.
Step 5. Write to a file on the memory card
In order to write to a file, it is necessary to open it by additionally informing the open method FILE_WRITE argument, if the method returns true, it is possible to overwrite the data using the print method of the File class.
bool TFWriteFile(String path, String str) {
	File file = SD.open(strToChar(path), FILE_WRITE);
	bool res = false;
	if (file)
	{
		if (file.print(str)) res = true;
	}
	file.close();
	return false;
}
Step 6. Make Wi-Fi setup using wifi.ini
It would be nice if you write to a file in each line of the known Wi-Fi network (Fig. 5, 5.1) and the device would be able to connect to the first available.

Figure 5. The contents of the folder system
Figure 5.1. Wi-Fi access.ini
Do so! Tracking the connection state during the connection will be done by means of status method-class Wi-Fi. Let's write a timeout of 10 seconds for one network, I think it will be enough:
bool configWifi() {
	/* Get WiFi SSID & password from wifi.ini from TF-card */
	String file = TFReadFile("/system/wifi.ini");
	if (file != "")
	{
		for (int i = 0; i < cntChrs(file, '\n'); i++)
		{
			String wifi = parseString(i, '\n', file);
			wifi = wifi.substring(0, (wifi.length() - 1)); // remove last char '\r'
			String ssid = parseString(0, ' ', wifi);
			String pswd = parseString(1, ' ', wifi);
			char* ssid_ = strToChar(ssid);
			char* pswd_ = strToChar(pswd);
			if (WiFi.begin(ssid_, pswd_))
			{
				delay(10);
				unsigned long timeout = 10000;
				unsigned long previousMillis = millis();
				while (true)
				{
					unsigned long currentMillis = millis();
					if (currentMillis - previousMillis > timeout) break;
				  	if (WiFi.status() == WL_CONNECTED) return true;
					delay(100);
				}
			  }
			}
  		}
  	return false;
}
Step 7. Let's count views
Every time you open any page, the client will increase the view count by one.
To store the counter, we will automatically create a views file in the system folder. Why will we do it without the file extension? It's for the device, not the computer. It would be better.int getViews() { String file = TFReadFile("/system/views"); if (file != "") return file.toInt(); return -1; } bool increaseViews() { int total = getViews(); if (total != -1) { total++; if (TFWriteFile("/system/views", (String)(total))) return true; } else { if (TFWriteFile("/system/views", (String)(1))) return true; } return false; }Step 8. We accept customer requests. A classic of the genre
It is extremely simple! Script and styles get from the memory card, the icon from the external site, and the content with *.md files. Simple as that! By the way, take a look at the openPage function.
String openPage(String page) {
	page += ".md";
	String content = TFReadFile(page);
	if (content != "")
	{
		increaseViews();
		drawViews();
		return content;
	}
	return "# 404 NOT FOUND #\n### MARKDOWN WEB SERVER ON M5STACK  ###"; // if not found 404
}

void loop() {
	String currentString = "";
	bool readyResponse = false;
	WiFiClient client = server.available();
	while (client.connected())
	{
    	if (client.available())
    	{
      		char c = client.read();
     		if ((c != '\r') && (c != '\n'))
      			currentString += c;
      		else
        		readyResponse = true;

			if (readyResponse)
	      	{
				String GET = parseGET(currentString);
				String mrkdwnContent = openPage(GET);
				client.flush();
				client.println("HTTP/1.1 200 OK");
				client.println("Content-type:text/html");
				client.println();
				client.println("<html>");
				client.println("<head>");
				client.println("<meta http-equiv=\"content-type\" content=\"text/html; charset=utf-8\"/>");
				client.println("<title>Markdown page | M5STACK</title>");
				client.println("<link rel=\"icon\" type=\"image/x-icon\" href=\"http://m5stack.com/favicon.ico\">");
				client.println("<script type=\"text/javascript\">" + TFReadFile("/system/markdown.js") + "</script>");
				client.println("<style type=\"text/css\">" + TFReadFile("/system/style.css") + "</style>");
				client.println("</head>");
				client.println("<body>");
				client.println("<article></article>");
				client.println("<script type=\"text/javascript\">");
				client.println("const message = `" + mrkdwnContent + "`;");
				client.println("const article = document.querySelector('article');");
				client.println("article.innerHTML = markdown.toHTML(message);");
				client.println("</script>");
				client.println("</body>");
				client.print("</html>");
				client.println();
				client.println();
				readyResponse = false;
				currentString = "";
				client.stop();
	      	}
		}
	}
}
Step 9. Run
Good job! The memory card is on the table and waiting to be installed in the slot, and the device meanwhile reminds us of it (Fig. 6).

Figure 6. Insert the memory card
And finally we installed the memory card and pressed the reset button on the device. Wait... At this point, the device searches for an available known wireless network and tries to connect to it (Fig. 6.1).

Figure 6.1. Wait...
And here it is! Got! The device shows the address on its display. It is necessary to connect soon! (rice. 6.2).

Figure 6.2. Ready for operation! First-run
The 404 page that is pleasing to the eye (Fig. 6.3). Do not be afraid - we did not do index :)
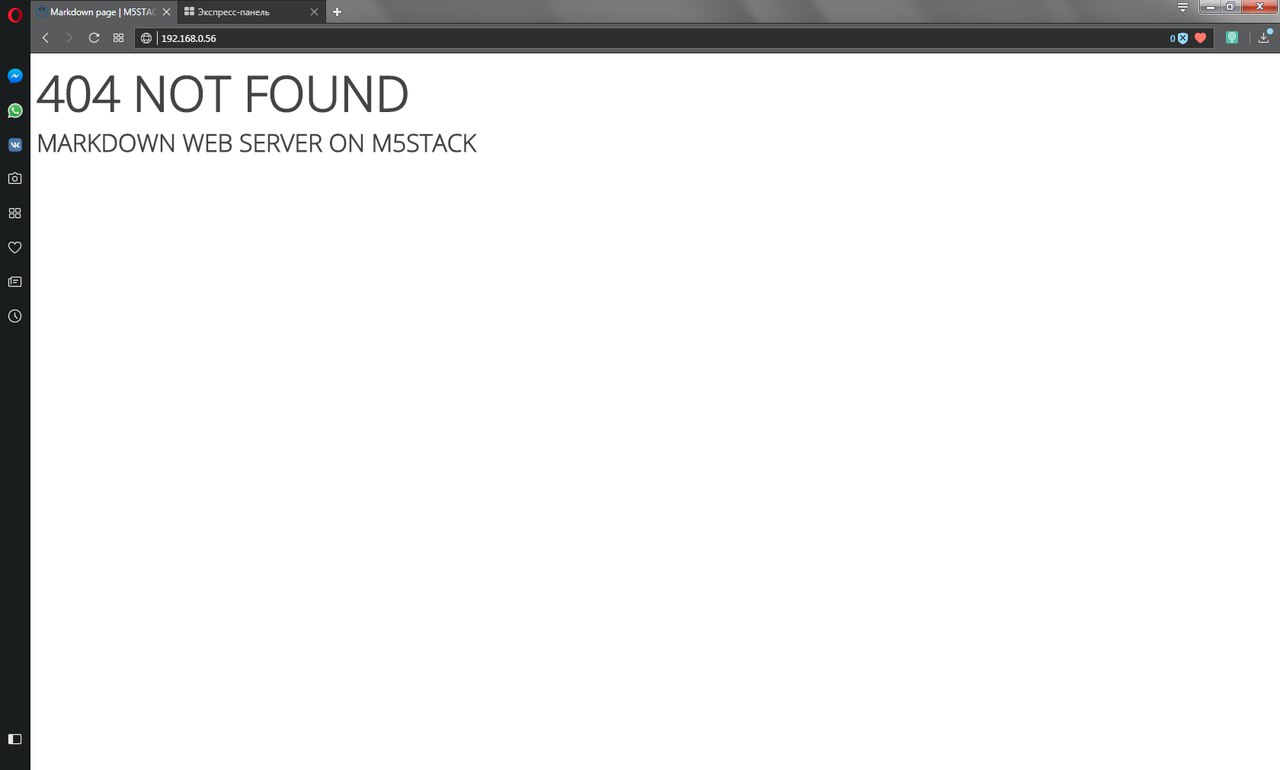
Figure 6.3. Page 404
And now let's open what we did it for - factorial page.
Please note: we do not use the file extension (*.md) in the address bar of the browser, see openPage function (Fig. 6.4).
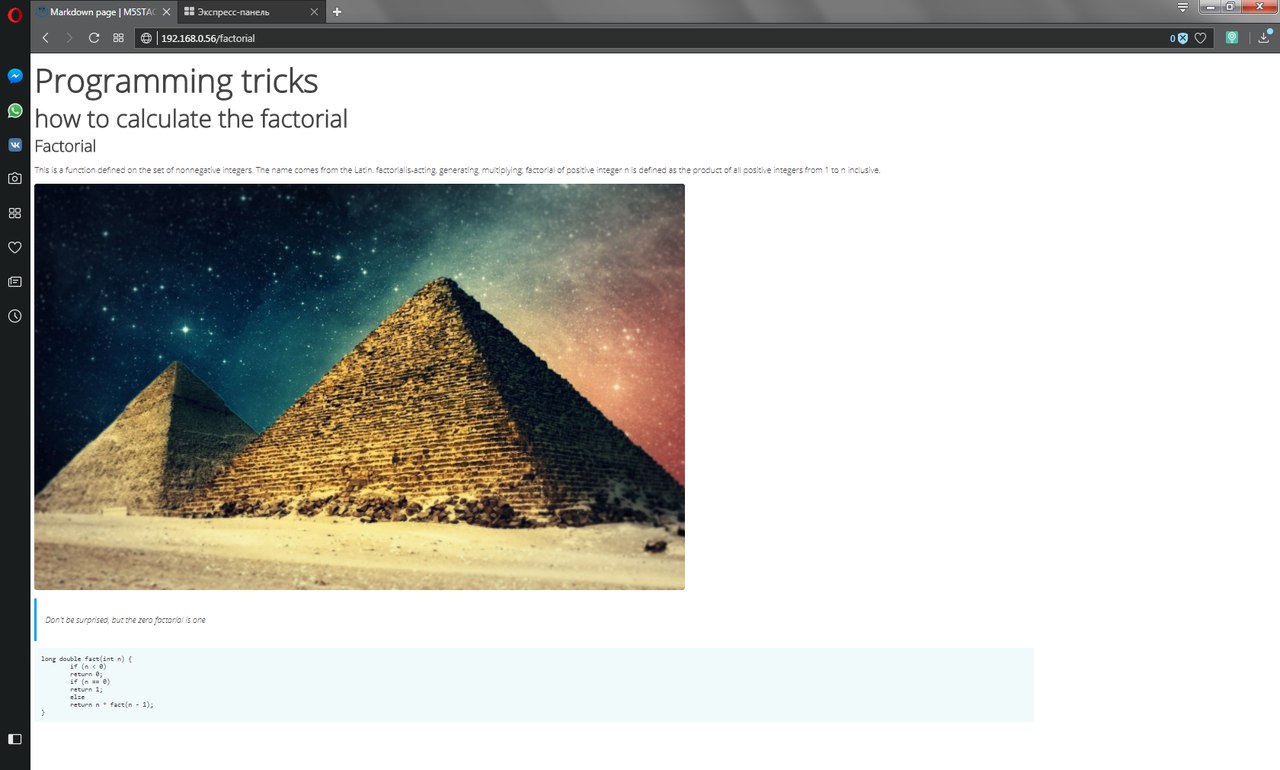
Figure 6.4. That's fine!
Download
- Files to be copied to the root of the memory card: https://yadi.sk/d/I7YlKZT-3SdDfx
- Converter "image to array" permission 59x59 px: https://yadi.sk/d/Y0w1r1hR3SdTu7
- Sketch: https://yadi.sk/d/SCktJBQm3SdD9m
-
@dimi Hi Dimi,
Thanks - great lesson ! Very useful. Well documented ! The screen display asking for the TF card is a good addition. -
@jimit thank! I do everything to make new lessons better
-
hello I have a problem I think the M5Stack does not mark my SD card because it can not find the WIFI configuration file
-
So, I found my mistake, I put the 3 files in the SD card while it was put in the system file. first problem solved but now he still does not want to connect to my PA, he connects and then disconnects 5 seconds later